Glacier Photography Tips for Beginners
Capturing the Chugach Majesty
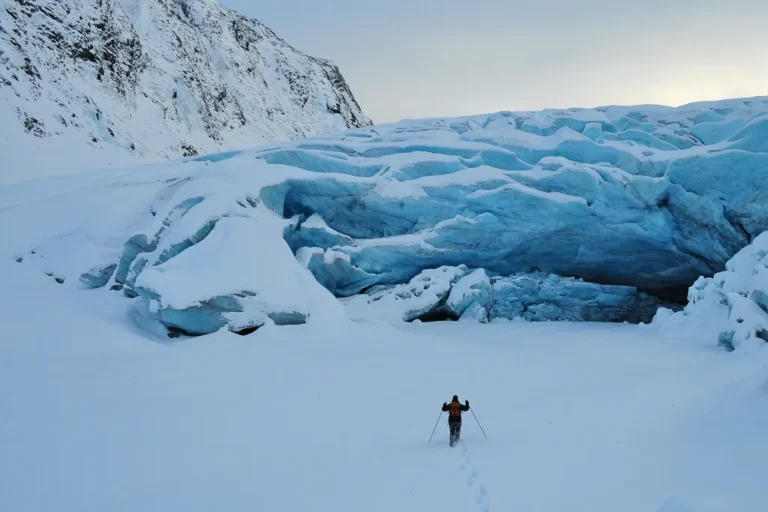
The visual gravity of a hanging glacier challenges even seasoned landscape photographers. Byron Glacier grips the sheer rock faces of the Chugach Mountains—a massive, fractured shelf of ancient ice suspended heavily above the valley floor. For beginners attempting to document the Alaskan wilderness, this relatively short hike acts as a brutal but rewarding masterclass in scale, exposure, and atmospheric lighting. You are not simply pointing a lens at a frozen block; you are attempting to translate immense geological weight into a two-dimensional frame. The trail itself transitions from a flat, acessible gravel path into a rugged, unpredictable boulder field. That physical transition forces a shift in your photographic approach, demanding that you adapt to uneven terrain and shifting weather fronts while managing your equipment.
Before stepping onto the gravel, you must recognize the unique optical properties of the Portage Valley. The steep mountain walls block peripheral sunlight, creating a high-contrast environment where deep shadows and blinding snowfields exist in the same composition. Mastering this location requires a deliberate strategy. From understanding lens compression to managing the relentless summer twilight, the decisions you make at the trailhead determine the quality of the images you pull from the mountain.
Gear Essentials for the Trail
Carrying fifty pounds of camera equipment across a boulder scramble will quickly ruin your afternoon. The 2.8-mile round-trip distance detailed in our trail map and conditions guide sounds deceptively brief, but the final approach to the ice base demands perfect balance and free hands. Photographers must prioritize versatile, weather-sealed gear over a massive arsenal of prime lenses.
- Wide-Angle Zoom (16-35mm): Essential for swallowing the entire mountain range and establishing the vastness of the valley. A wide field of view allows you to anchor the foreground with elements like the rushing glacial creek.
- Telephoto Lens (70-200mm+): Crucial for compressing the distance and isolating the deep blue crevasses without stepping into hazardous fall zones. This focal length also prepares you for unexpected wildlife encounters.
- Circular Polarizer (CPL): The single most important filter in your bag. A CPL strips away the harsh glare from wet stones and glacial runoff, forcing the dense blue tones of the compressed ice to the surface.
- Carbon Fiber Tripod: Aluminum tripods draw the cold directly into your hands and weigh you down on the scramble. Carbon fiber dampens the micro-vibrations caused by heavy valley winds.
Coastal moisture sweeping through the valley frequently coats camera bodies in a fine, persistent mist. Pack a lightweight rain sleeve and dedicate an interior pocket to microfiber cloths. Before setting up your tripod in the brush, review the National Park Service guidelines on photography ethics to understand how your physical footprint impacts fragile alpine ecosystems. Reading up on general safety essentials for Alaska hiking prepares you for the sudden temperature drops that plague the valley floor.
Optimal Lighting & Seasonal Timing
Alaska punishes photographers who rely on standard midday light. During the peak of summer, the sun hangs high and casts a harsh, flat wash over the ice that entirely destroys its structural details. The blue color of a glacier is born from immense geological pressure squeezing the oxygen out of the snow, allowing the ice to absorb red wavelengths and reflect blue. To capture this phenomenon accurately—a topic we explore deeply in our glacier science and wildlife guide—you must shoot when the light is diffused.
Understanding the long Alaskan twilight dramatically improves your results. Always pull the latest forecast from the National Weather Service Alaska region before leaving your hotel, as Portage Valley storms materialize with zero warning. Check our seasonal guide to track exact sunrise and sunset windows for your specific travel dates.
| Time of Day/Season | Lighting Condition | Best Subject |
|---|---|---|
| Mid-Day Summer | Harsh/High Contrast | Glacial Textures |
| Late Evening | Soft/Golden Glow | Chugach Mountain Peaks |
| Cloudy/Overcast | Diffused/Blue Tones | Glacial Ice Hues |
Composition & Technique
Mastering Scale
A hanging glacier lacks context when photographed against a blank sky. To convey its immense size, you must anchor your foreground. Use clusters of fireweed, jagged slate boulders, or even a fellow hiker standing at a safe distance to establish proportion. Without a recognizable object in the frame, the viewer’s brain cannot calculate the true magnitude of the ice shelf looming above.
Composition Basics
The gravel path flanking Byron Creek creates a natural leading line. Position your tripod low to the ground, letting the rushing water or the distinct trail edge pull the viewer’s eye straight toward the ice formation. Applying the Rule of Thirds prevents the massive white snowfields from dominating the image. This is the environment you’ll be shooting in.
Modern camera sensors naturally want to turn bright white scenes into a dull, middle gray. When you point your lens at the sprawling snowfields surrounding the valley, your camera’s internal light meter will likely underexpose the shot. To combat this physical limitation, dial in a positive exposure compensation of +1 or +1.5 stops. This forces the snow to render crisp and white without blowing out the highlights on the ice face.
Safety & Environmental Awareness
A striking photograph is never worth a rescue operation. The jagged, luminous allure of glacial formations often tempts beginners into making catastrophic miscalculations. Entering the hollowed-out spaces beneath the ice carries extreme, life-threatening risks due to sudden cave-ins and falling debris. You must read the specific warnings detailed in our ice caves and avalanche safety breakdown before you attempt to close your distance from teh ice.
Never prioritize the perfect composition over your physical safety. Glaciers are dynamic, moving rivers of ice that calve without a sound.
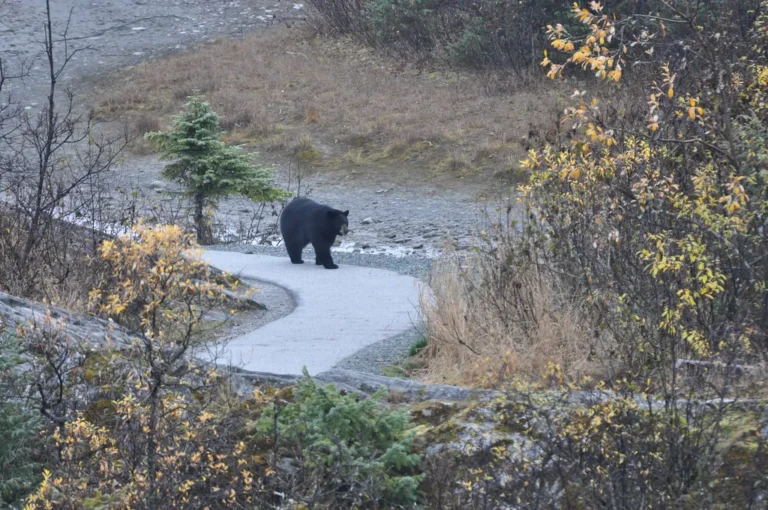
Wildlife encounters represent another unpredictable variable on the trail. The Portage Valley sustains highly active populations of brown and black bears. Keep your camera strapped firmly to your body—never set your expensive gear down on a rock and walk away to scout a better angle. Carry bear spray on your hip, entirely accessible, rather than buried at the bottom of your camera bag. Familiarize yourself with bear country etiquette and consult the Alaska Department of Fish and Game’s wildlife viewing guidelines to maintain a respectful, legal distance from local fauna.
Glaciers generate their own hostile microclimates. The dense ice cools the air immediately above it, causing that heavy, frigid air to rush violently down the valley floor. These katabatic winds carry fine glacial silt directly into your lens element. A simple UV filter acts as a sacrificial layer against flying grit. The plunging temperatures near the ice face will also drain your lithium-ion batteries at an alarming rate. Keep your spare batteries pressed close to your body heat—an inner jacket pocket works perfectly—to extend their lifespan during a long session on the rocks.
Professional Guidance & Logistics
Mastering glacial photography while managing personal safety in bear country requires immense, divided focus. If you prefer to bypass the logistical stress, joining a structured excursion allows you to concentrate purely on your aperture and shutter speed. Many photographers arriving from Anchorage via the Seward Highway prefer to bundle their photography sessions with broader regional exploration. Securing a spot on the Glacier & Wildlife Discovery Tour removes the burden of driving, allowing you to clean your lenses and review your exposure settings while someone else handles the road.
For those combining a broader itinerary, the Seward to Anchorage Cruise Transfer & Wildlife Tour provides dedicated stops for landscape shooting. Local guides intimately understand how the shadows stretch across the Chugach National Forest. They monitor trail washouts, track animal movements, and steer you away from unseen hazards. Discover more structured options on our tickets and tours page, or figure out your own logistics by studying how to get to Byron Glacier Trail if you intend to shoot solo.
Shooting RAW is non-negotiable when photographing the Chugach Mountains. The dynamic range difference between the shadowed rock faces and the intensely bright snowfields will stretch your camera’s sensor to its absolute limit. In post-production, bring down your highlights to recover the micro-textures in the ice, and gently lift the shadows to reveal the jagged details of the valley walls. Resist the urge to aggressively push the saturation slider. Over-saturating the image destroys the subtle, natural gradient between the ancient ice and the surrounding gray slate.
Finally, before you even think about unpacking a drone to capture aerial footage of the valley, review the strict visitor rules and guidelines. Airspace regulations above national forests and active glaciers are heavily enforced to protect nesting birds and prevent interference with emergency aviation operations. Respect the landscape, protect your gear, and let the sheer magnitude of Byron Glacier do the heavy lifting for your portfolio.